... well, it's a surprise. All be revealed in the last episode... ")
Material: 20mm Baltic birch ply, import from Latvia (!).
Target: A two-part plinth, 3 layers each, which will eventually either be used like that with rubber/neoprene dampers between the two parts, or both parts glued together into a conventional monolithic plinth. Ultimate decision will be a compromise between testing the oprions, aesthetics, practicality - whatever 'xxx' decides.
Objectives:
Since Baltic birch ply is not very heavy and there seems to be very little glue and no impregnation in it at all, I wanted to layer the plinth so that 301 internals fit snugly and preserve as much wood in the plinth as possible.
Plinth size must cater for max. arm length equal to SME 3012, hopefully even with lid closed (if one is to be used).
Arm mount - minimal damping flex. Straight to the plinth via minimalistic plate. Arm/plate must provide it's own damping if required (SME rubber rings or similar method).
Started with most common templates downloaded from Net, but wasn't entirely happy with them.
Tried making my own and succeeded - significantly more material preserved in the first layer compared to the standard template. I even cut (scroll-saw) the exact shape for the first layer from the 6mm MDF but before taking the next step and making the routing template, I realised that it will be 10 times more complicated and time consuming if I go that way, because of many tight bends which standard router guide would not be able to follow. All in all, wasted two weeks with drawings and tools and jigs and templates, seeking perfection. Eventually jigsaw did it.
I so WISH I had JQ's woodworking talent and skills. Skills... maybe one day, given enough practice.
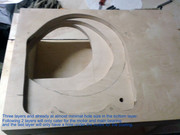
Only the top layer is taken from the standard template. Each of the lower layers was measured individually for tight fit (minimum material removal).
This is today's work. Not sure I'll find the time to continue with it tomorrow, we'll see.
Using my 301 ( thanks Tom!) and Audio Technica ATP-16T 11.5" (thanks Placebo!) for fitting.


Decided that for the next one, I MUST make the routing templates after all. All that it takes is a simplified top layer, other layers will be dead easy. Trial and error, what can I say...
Material: 20mm Baltic birch ply, import from Latvia (!).
Target: A two-part plinth, 3 layers each, which will eventually either be used like that with rubber/neoprene dampers between the two parts, or both parts glued together into a conventional monolithic plinth. Ultimate decision will be a compromise between testing the oprions, aesthetics, practicality - whatever 'xxx' decides.
Objectives:
Since Baltic birch ply is not very heavy and there seems to be very little glue and no impregnation in it at all, I wanted to layer the plinth so that 301 internals fit snugly and preserve as much wood in the plinth as possible.
Plinth size must cater for max. arm length equal to SME 3012, hopefully even with lid closed (if one is to be used).
Arm mount - minimal damping flex. Straight to the plinth via minimalistic plate. Arm/plate must provide it's own damping if required (SME rubber rings or similar method).
Started with most common templates downloaded from Net, but wasn't entirely happy with them.
Tried making my own and succeeded - significantly more material preserved in the first layer compared to the standard template. I even cut (scroll-saw) the exact shape for the first layer from the 6mm MDF but before taking the next step and making the routing template, I realised that it will be 10 times more complicated and time consuming if I go that way, because of many tight bends which standard router guide would not be able to follow. All in all, wasted two weeks with drawings and tools and jigs and templates, seeking perfection. Eventually jigsaw did it.
I so WISH I had JQ's woodworking talent and skills. Skills... maybe one day, given enough practice.
Only the top layer is taken from the standard template. Each of the lower layers was measured individually for tight fit (minimum material removal).
This is today's work. Not sure I'll find the time to continue with it tomorrow, we'll see.
Using my 301 ( thanks Tom!) and Audio Technica ATP-16T 11.5" (thanks Placebo!) for fitting.
Decided that for the next one, I MUST make the routing templates after all. All that it takes is a simplified top layer, other layers will be dead easy. Trial and error, what can I say...